YS's develop story
FCM을 이용하여 node js 푸시 알람 구현하기 본문
FCM을 이용하여 node js 푸시 알람 구현하기
사이트 firebase에서 프로젝트를 생성해 줍시다.
console.firebase.google.com/?hl=kofirebase.google.com/?hl=ko
Firebase
Firebase는 고품질 앱을 빠르게 개발하고 비즈니스를 성장시키는 데 도움이 되는 Google의 모바일 플랫폼입니다.
firebase.google.com
사용하고자 하는 앱에 firebase를 사이트에서 하라는 대로 추가해 줍시다.

클라이언트 쪽에서 아래와 같은 코드를 통해 디바이스 토큰을 받습니다.
FirebaseMessaging.getInstance().token.addOnCompleteListener(OnCompleteListener { task ->
            if (!task.isSuccessful) {
                Log.w(TAG, "Fetching FCM registration token failed", task.exception)
                return@OnCompleteListener
            }

            // Get new FCM registration token
            val token = task.result

            // Log and toast
            val msg =token.toString();
            Log.d(TAG, msg)
            Toast.makeText(baseContext, msg, Toast.LENGTH_SHORT).show()
        })
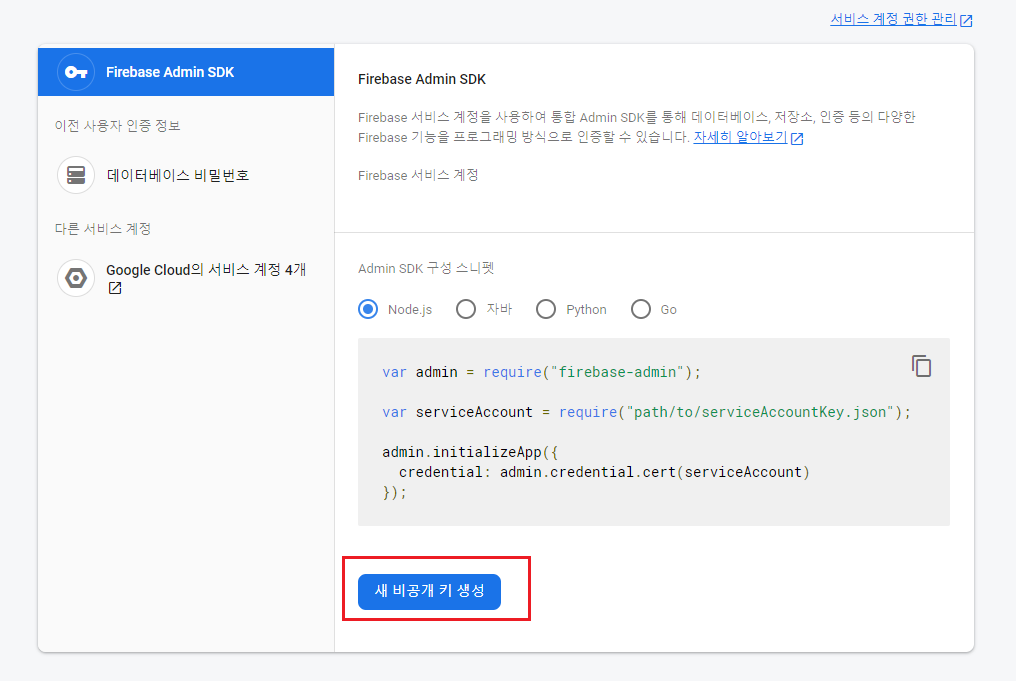
아래와 같이 프로젝트 설정 - 서비스 계정 - 새 비공개 키 생성을 통해 비 공개키를 다운로드 해 줍시다.


다운로드한 비공개 키의 경로를 js파일에서 아래와 같이 설정해 줍시다.
/////////////////////////////pushAlarm/////////////////
const admin = require("firebase-admin");

let serviceAccount = require("./firebase-admin.json");

admin.initializeApp({
  credential: admin.credential.cert(serviceAccount),
});
//////////////////////////////pushAlarm//////////////////
저는 테스트를 해보기 위해 아래와 같이 추가를 해주었습니다.
Route.js

Contorller.js
const admin = require('firebase-admin');

exports.pushAlarm = async function (req, res){

 //디바이스의 토큰 값
  let deviceToken =`토큰값입력`

  let message = {
    notification: {
      title: '테스트 발송💛',
      body: '망고플레이트 앱 확인해보세요!💚',
    },
    token: deviceToken,
  }

  admin
    .messaging()
    .send(message)
    .then(function (response) {
      console.log('Successfully sent message: : ', response)
      return res.status(200).json({success : true})
    })
    .catch(function (err) {
        console.log('Error Sending message!!! : ', err)
        return res.status(400).json({success : false})
    });

}
deviceToken에 특정 유저의 토큰 값을 넣게 되면 그 유저에게 푸시 알람이 가게 됩니다.
예를 들어 2번 유저가 작성한 리뷰에 댓글이 달렸을 때 2번 유저에게 푸시 알람을 보내고 싶다면
deviceToken에 2번 유저의 토큰 값을 입력하면 됩니다.
그렇게 하기 위해서는 디바이스 토큰 값을 로그인을 할 때 클라이언트 쪽에서 받아서
유저 DB에 디바이스 토큰 값을 같이 저장하면 됩니다.
리뷰 댓글 작성 api를 설계하면서 리뷰 댓글을 성공적으로 작성하게 된다면
댓글이 달린 리뷰를 작성한 유저 인덱스의 디바이스 토큰으로 '댓글이 달렸습니다'와 같은
푸시 알람이 가도록 하면 되겠죠.
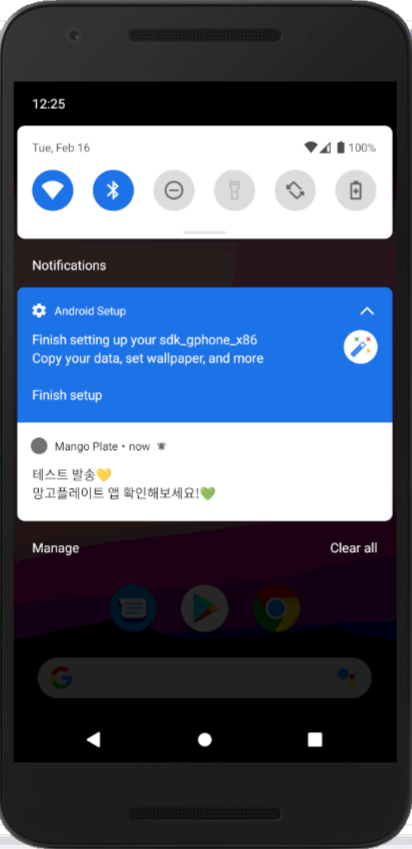
저는 일단 테스트를 하고자 deviceToken에 저의 디바이스 토큰을 넣고 포스트맨에서 이를 요청해보았습니다.
그 결과... 아래와 같이 성공적으로 푸시 알림이 오게 됩니다.!

전체 적인 과정은 이렇습니다.
1. client app을 notification server에 등록합니다.
2. client app을 켜면 각각의 client app을 구분하는 token을 notification server에서 발급합니다
3. client app에서 이 token을 서버로 전송합니다.
4. 서버는 token을 저장해 둡니다.
5. clientapp에 알림을 전송할 필요가 있을 때 토큰 값과 함께 notification server에 요청합니다.
6. client app에서 push 알림을 수신합니다.
'기타 > 라이징프로그래머 2기' 카테고리의 다른 글
| 서버 개발 주의사항 (0) | 2021.03.01 |
|---|---|
| Nginx 서브 도메인, Nginx reverse proxy 적용하기 (0) | 2021.02.27 |
| Query String 과 Path Variable 비교 및 활용 (0) | 2021.02.09 |
| API와 REST API란 무엇인가..? (0) | 2021.02.08 |
| (RP2기 6주차 과제 ) AWS EC2에서 node.js 배포 하기 (0) | 2021.02.06 |


