YS's develop story
JSP, Tomcat활용하여 MySQL 데이터 가져오기 본문
JSP, Tomcat 활용하여 MySQL 데이터 가져오기

아래 사이트에서 MySQL Connector을 plaform independent 선택 후 다운로드해줍니다.
MySQL :: Download Connector/J
MySQL Connector/J 8.0 is highly recommended for use with MySQL Server 8.0, 5.7 and 5.6. Please upgrade to MySQL Connector/J 8.0.
dev.mysql.com


저는 프로젝트에서 lib폴더를 따로 생성해서 다운로드한 connector을 폴더에 넣어주었습니다.
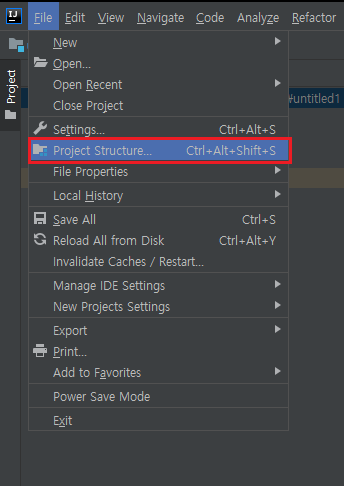
File - Project Structure

Libraries 클릭 후 +를 눌러 폴더에 넣어준 mysql-connect.jar 파일을 선택해 줍니다.
아래와 같은 코드로 DB에 연결해서 SQL문으로 데이터를 가져올 수 있습니다.
import java.sql.*;

public class DBpractice1 {

    public static void main(String[] args) {

        String url = "jdbc:mysql://DB이름";
        String dbUserId = "";
        String dbUserPassword = "";

        Connection connection = null;
        ResultSet resultSet = null;
        PreparedStatement preparedStatement = null;

        try {
            Class.forName("com.mysql.cj.jdbc.Driver");

        } catch (ClassNotFoundException e) {
            e.printStackTrace();
        }

        try {
            connection = DriverManager.getConnection(url, dbUserId, dbUserPassword);

            String sql = "select * from Coupon where nickname = ? and couponName = ?";

            preparedStatement = connection.prepareStatement(sql);
            preparedStatement.setString(1, "Steve01");
            preparedStatement.setString(2, "openevent");
            resultSet = preparedStatement.executeQuery();

            while (resultSet.next()) {
                String couponName = resultSet.getString("couponName");
                String nickname = resultSet.getString("nickname");
                System.out.println(String.format("%s : %s", couponName, nickname));
            }

        } catch (SQLException e) {
            e.printStackTrace();
        } finally {
            try {
                if (resultSet != null && !resultSet.isClosed()) {
                    resultSet.close();
                }
            } catch (SQLException e) {
                e.printStackTrace();
            }

            try {
                if (connection != null && !connection.isClosed()) {
                    connection.close();
                }
            } catch (SQLException e) {
                e.printStackTrace();
            }

            try {
                if (preparedStatement != null && !preparedStatement.isClosed()) {
                    preparedStatement.close();
                }
            } catch (SQLException e) {
                e.printStackTrace();
            }
        }
    }
}
Apache Tomcat® - Apache Tomcat 9 Software Downloads
Welcome to the Apache Tomcat® 9.x software download page. This page provides download links for obtaining the latest version of Tomcat 9.0.x software, as well as links to the archives of older releases. Unsure which version you need? Specification version
tomcat.apache.org
위 사이트에서 Tomcat을 다운로드해 줍니다.

Add Framework Support 클릭
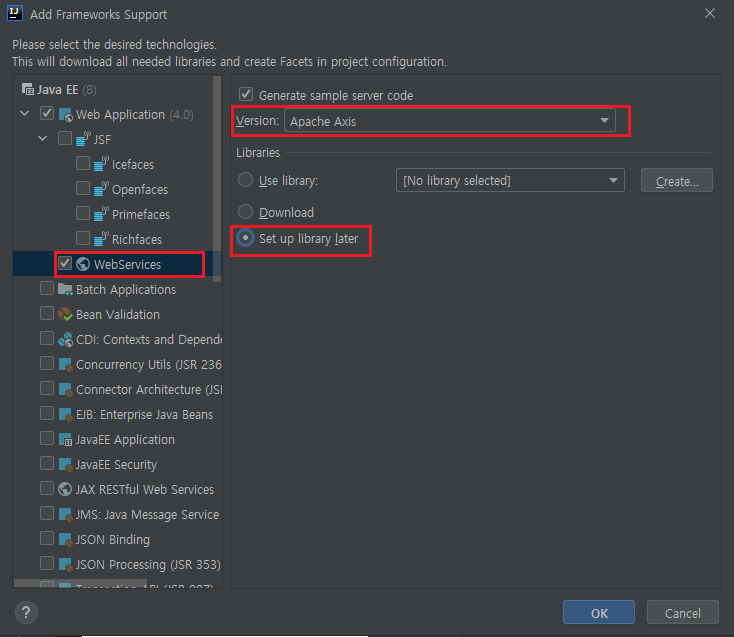
WebServices클릭 후 위와 같이 선택해 줍니다.
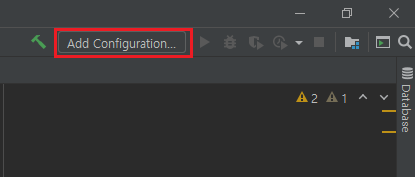
Intellij 우측 상단에 Add Configuration 선택 후

Tomcat Server - Local을 선택해 줍니다.

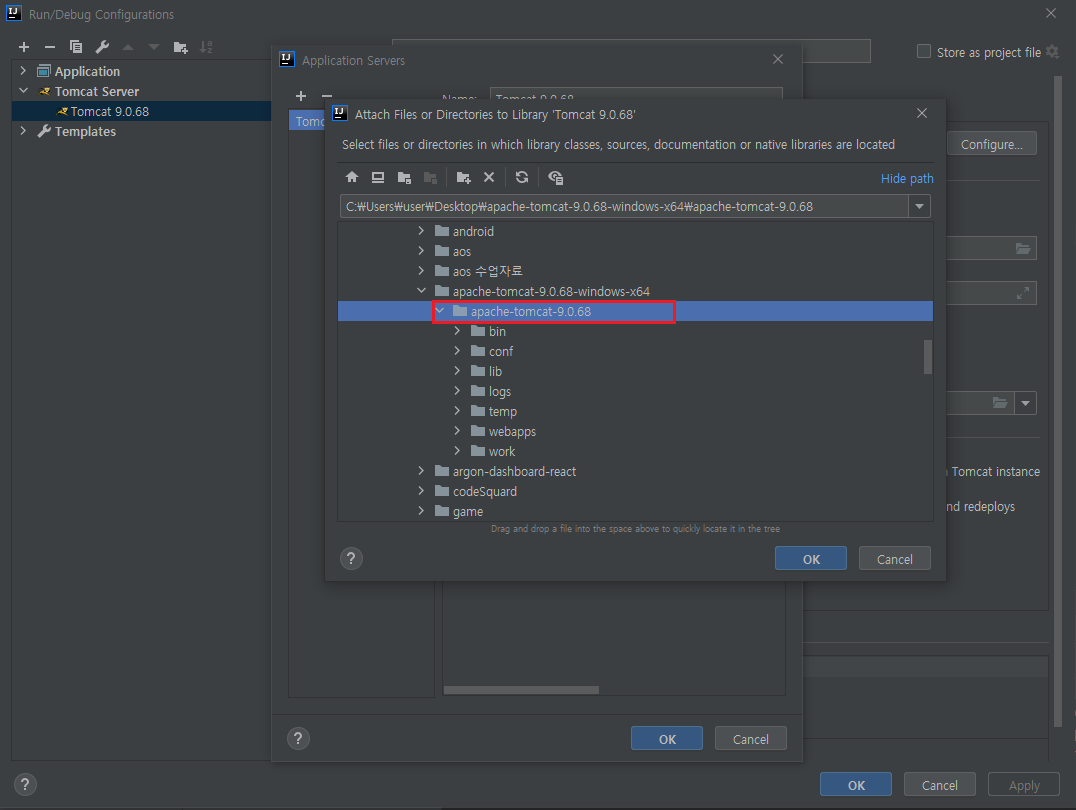
Configure을 통해 다운로드한 Tomcat의 위치를 지정해 줍니다.

그 후 Fix버튼을 클릭해 줍니다.


Deployment 클릭 후 연필 모양의 버튼을 클릭한 다음 Fix 버튼을 클릭해 mysql connector을 인식할 수 있도록 해 줍니다.
mysql에서 데이터를 가져와서 JSP파일로 잘 보이는 것을 확인하기 위해 아래와 같이 코드를 약간 변경했습니다.
package test1;

import java.sql.*;
import java.util.ArrayList;
import java.util.List;


public class DBpractice1 {
    public static void main(String[] args){
    }

    public static ArrayList<Coupon> test() {

        String url = "jdbc:mysql://.../db명";
        String dbUserId = "";
        String dbUserPassword = "";

        Connection connection = null;
        ResultSet resultSet = null;
        PreparedStatement preparedStatement = null;
        ArrayList<Coupon> couponList = new ArrayList<>();

        try {
            Class.forName("com.mysql.cj.jdbc.Driver");

        } catch (ClassNotFoundException e) {
            e.printStackTrace();
        }

        try {
            connection = DriverManager.getConnection(url, dbUserId, dbUserPassword);

            String sql = "select couponName,nickname from Coupon";

            preparedStatement = connection.prepareStatement(sql);
            //preparedStatement.setString(1, "Steve01");
            //preparedStatement.setString(2, "openevent");
            resultSet = preparedStatement.executeQuery();

            while (resultSet.next()) {
                String couponName = resultSet.getString("couponName");
                String nickname = resultSet.getString("nickname");
                System.out.println(String.format("%s : %s", couponName, nickname));
                couponList.add(new Coupon(nickname,couponName));
            }

        } catch (SQLException e) {
            e.printStackTrace();
        } finally {
            try {
                if (resultSet != null && !resultSet.isClosed()) {
                    resultSet.close();
                }
            } catch (SQLException e) {
                e.printStackTrace();
            }

            try {
                if (connection != null && !connection.isClosed()) {
                    connection.close();
                }
            } catch (SQLException e) {
                e.printStackTrace();
            }

            try {
                if (preparedStatement != null && !preparedStatement.isClosed()) {
                    preparedStatement.close();
                }
            } catch (SQLException e) {
                e.printStackTrace();
            }
            return couponList;
        }
    }
}
package test1;
public class Coupon {
String nickname;
String couponName;
Coupon(String nickname,String couponName){
this.nickname = nickname;
this.couponName = couponName;
}
public String getCouponName() {
return couponName;
}
public String getNickname() {
return nickname;
}
}
<%@ page import="test1.DBpractice1" %>
<%@ page import="test1.Coupon" %>
<%@ page import="java.util.ArrayList" %>
<%@ page contentType="text/html;charset=UTF-8" language="java" %>
<html>
  <head>
    <title>JSP TEST</title>
  </head>
  <body>
  <%
    DBpractice1 dBpractice1 = new DBpractice1();
    ArrayList<Coupon> couponArrayList = dBpractice1.test();

    for (Coupon i : couponArrayList){
      out.println("<p>"+i.getCouponName()+"</p>");
      out.println("<p>"+i.getNickname()+"</p>");
      out.println("<p>-----------------</p>");
    }
  %>
  </body>
</html>
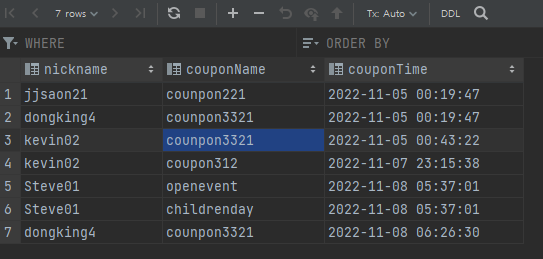
위와 같은 데이터베이스에 있는 데이터를 잘 가져오는지 확인해 봅시다.

Tomcat 실행 후 생성한 JSP파일을 확인한 결과입니다.
이를 활용하여 SQL의 Insert, Delete, Update을 활용하면 JSP을 통해 다양한 웹 페이지를 만들 수 있을 거 같네요!
'Java' 카테고리의 다른 글
| 싱글톤 vs HikariCP, Connection 관리 부분에서 어떤 차이점이 있을까 (0) | 2025.05.01 |
|---|---|
| 자주 사용하는 정규 표현식(Regex) 정리 (0) | 2023.08.01 |
| JAVA error) The method must override or implement a supertype method (1) | 2020.11.06 |
| Java ) java 상속관련 .. (0) | 2020.10.16 |
| JAVA error) Implicit super constructor is undefined, Constructor call must be the first statement in a constructor. (0) | 2020.10.14 |


